Building & Editing a Degree Plan
BUILDING A DEGREE PLAN
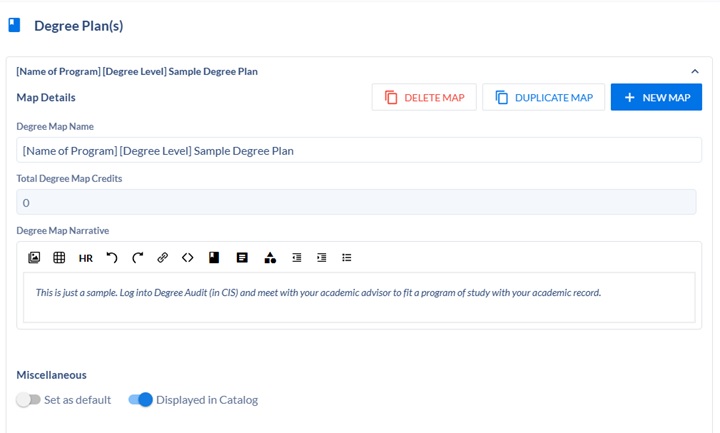
Step 1:While editing or creating a proposal, select +NEW MAP in the Degree Plan(s) field.

Step 2: Fill out the necessary information.
Degree Map Name: Suggested format – [Name of Program] [Degree Level] Sample Degree Plan
- Example: Elementary Education BS Sample Degree Plan
Total Degree Map Credits: An automatically calculated sum of the credits within the degree map, calculated by adding credit values from each requirement in the degree map. This includes General Education & Bachelor Degree requirement credits, total major credits, and total elective credits.
Degree Map Narrative
- Enter the following text in the Degree Map Narrative field: This is just a sample. Log into Degree Audit (in CIS) and meet with your academic advisor to fit a program of study with your academic record.
Miscellaneous
- Set as default: Controls if the degree map is the first to display in the list of degree maps for the program in the catalog.
- Displayed in Catalog: Controls if the degree map is displayed in the catalog view for the program.
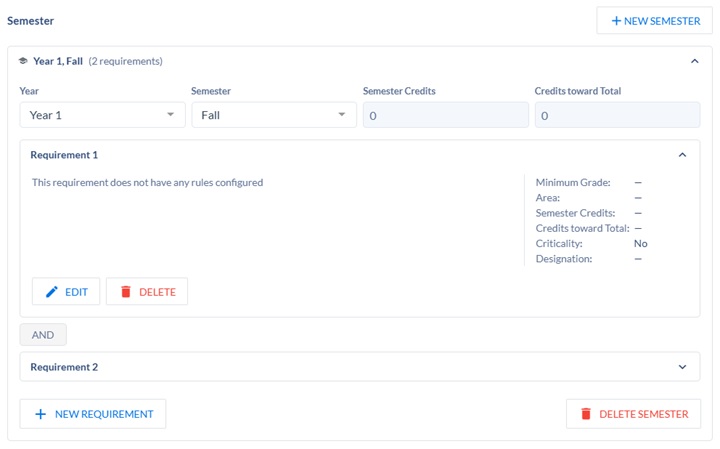
Step 3:Degree maps are structured as years, then semesters within those years. New semesters can be added by clicking +NEW SEMESTER, and the year and semester name can be customized using the drop-down fields.

Step 4: Build requirements using the steps below.
- Click into the semester you wish to edit and click +NEW REQUIREMENT.
- Click into the requirement and select Edit.
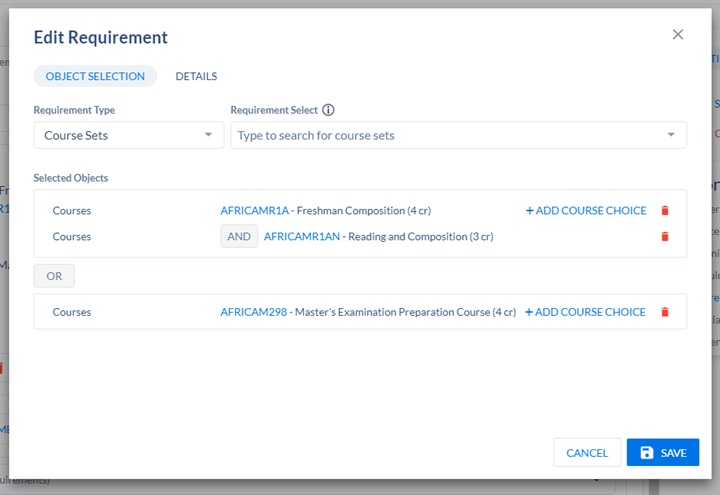
- This will open up a modal to add and edit requirement types and other details.
- Select the Requirement Type from the dropdown.
- You can add a combination of them, e.g. 2 courses and 1 course set.
- Select the items you want to add from the Requirement Select dropdown.
- See Object Selection & Details below for more information.
- For courses, you can use the +Add Course Choice option to use “AND” logic. See “Add Course Choice” and “AND/OR Logic” below for more details.
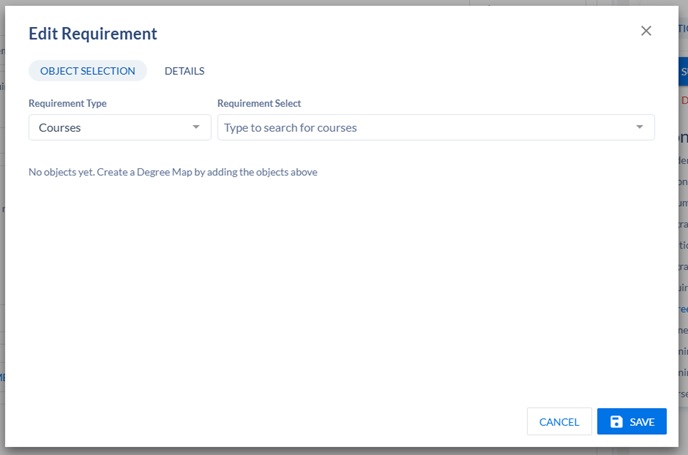
OBJECT SELECTION
- Requirement Type: This field allows you to select the type of requirement for each field. In the default
degree map, you are able to select: courses, course sets, course attributes, requirement
designations, milestones, and generic.
- COURSES – Add active courses that students need to take.
- REQUIREMENT DESIGNATIONS – Maps to the PeopleSoft field of the same name.
- MILESTONE – This is a free-text field; it is useful to represent any type of non-course milestone, such as “Internship”. PeopleSoft specific.
- COURSE ATTRIBUTES – Any course attributes you have, such as “Laboratory” or “Independent Study”. PeopleSoft Specific.
- COURSE SETS – Allows you to re-use the same course sets across multiple degree maps, which is very useful for things such as General Education Requirements that are used across programs.
- GENERIC – This is a free-text field, which allows you to type in anything you want; particularly useful when the only requirement is a number of credits (e.g. “General Elective”, 2 credits).
- Requirement Select: Based on your input for the requirement type, you are able to select a requirement.
DETAILS
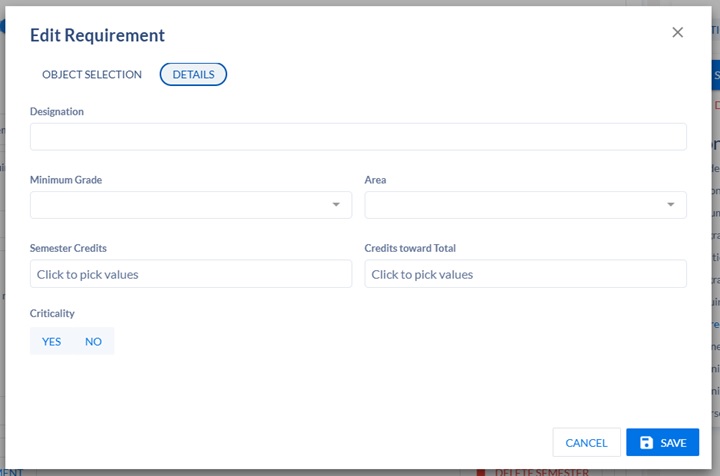
- Designation (free text): Allows you to indicate General Education/Bachelor Degree designation(s).
- Example: GE – WR2
- Example: BD - CW
- Minimum Grade: Allows you to select a minimum grade for a requirement.
- Area: Allows you to select if the requirement is for general education, major, minor, or elective.
- Semester Credits
- If a single course is selected for a requirement and that course has a credit value, Semester Credits is automatically populated with that value.
- If that course has a min and max credit value only, Semester Credits is displayed as a hyphenated range that you can edit by clicking into the field.
- If there are multiple courses listed for a single requirement, hard-coded logic will
treat those courses as "either/or". Semester Credits will be an editable, hyphenated
range with a min value of the course with the fewest credits, and a max value of the
course with the most credits.
- EXAMPLE 1: If three courses are listed under Requirement 1 and all three courses are 3 credits, the Semester Credits displayed will be 3.
- EXAMPLE 2: If two courses are listed for Requirement 2 – and one is 3 credits whereas the other is 4 – Semester Credits will display as a range of 3-4.
- Credits Toward Total: Derived from the progress credits field in the credits prebuilt card. Same logic for calculation of credit values as in Semester Credits. PeopleSoft-specific field.
- Criticality: You are able to indicate "yes" or "no" if the course is critical.
ADD COURSE CHOICE
- If you would like to use nested “And” logic in your degree map requirement, select “+ Course Choice” within a Course requirement.
- For example, to define a requirement as “Take (Math 1 AND Math 2) OR (Math 3), a user would:
- Add Math 1 as a course type requirement.
- Click “+ Add Course Choice” to add Math 2 to the same line.
- Use “Requirement Select” at top to add Math 3 using.
AND/OR LOGIC
- Items connected using “+ Add Course Choice” within the same object are always connected via AND.
- Selections across different objects but within the same requirement are always connected via OR.
- Requirements themselves are always connected to other requirements via AND.
Step 5: When you are done editing each requirement, click Save.
Step 6: For each requirement within the semester, click +NEW REQUIREMENT and repeat the above steps.
Step 7: Once you are done editing a semester, click +NEW SEMESTER and repeat the above steps.
Step 8: Once you have finished all degree plans, click Save Changes on the right-hand side of the screen under Actions.
EDITING A DEGREE PLAN
Step 1:When viewing an existing degree plan, click the Details tab to edit additional fields.
- See Object Selection & Details above for more information.
Step 2: When you are done editing each requirement, click Save.
Step 3 (Optional): If you wish to add additional requirements, click +NEW REQUIREMENT and repeat the above steps.
Step 4: Once you have finished editing your program, click Save Changes on the right-hand side of the screen under Actions.
